怎么在arm上搭建opencv
准备工作
之前的blog介绍了在windows上安装编译opencv,今天来介绍在arm上完成同样的操作。
文中描述的开发环境如下: 虚拟机: 选用的是Ubuntu(Linux version 4.4.0-142-generic (buildd@lgw01-amd64-032) (gcc version 4.8.4 (Ubuntu 4.8.4-2ubuntu1~14.04.4) ) #168~14.04.1-Ubuntu SMP Sat Jan 19 11:28:33 UTC 2019)
arm芯片: hisi-mv330,这块芯片是一块专门的视频处理芯片,可配合opencv的图形和视频处理功能较多,也是我在实际开发产品的时候用的一块芯片,超级便宜,不过坑很多。
交叉编译工具: arm-hisiv200-linux,华为海思提供的交叉编译工具,版本较早内嵌的gcc版本是 v4.4.0(这也是我折腾了很久的主要原因)。
软件版本
在实际的开发预研中,发现了很多问题,首先需要提的是最新的opencv 4.2.0 对C++11是有要求的,但是arm-hisiv200-linux这一套肯定是不兼容的。所以pass,在经过了接近一周的对比选择和测试后,最终确定使用opencv-3.1.0.
开始搭建opencv环境
老规矩,opencv源代码分为两个部分,第一部分opencv 作为稳定的核心功能;第二部分opencv_contrib 作为较不稳定的扩展功能包。 进入链接后下载3.1.0对应版本的两个包。
安装前置依赖库,这里我已经准备好了脚本段,直接复制运行即可
#opencv pre-install packet
apt-get install cmake-qt-gui
apt-get install pkg-config
apt-get install libavcodec-dev
apt-get install libavformat-dev
apt-get install libswscale-dev
apt-get install libgtk2.0-dev
apt-get install libdc1394-22-dev
apt-get install libjpeg-dev libpng-dev libtiff-dev libjasper-dev
PS: 这里需要特别提出来说的是cmake-gui这个程序,如果你编译的是较高版本的opencv建议cmake version 升级到 3.16.0以上。
常规操作在你自己的opencv操作目录,解压两个程序包。
运行 cmake-gui 打开配置界面
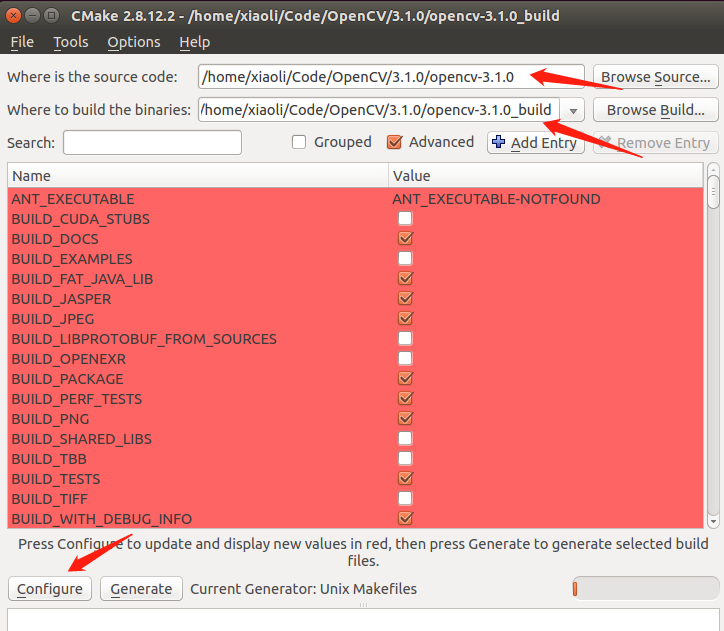
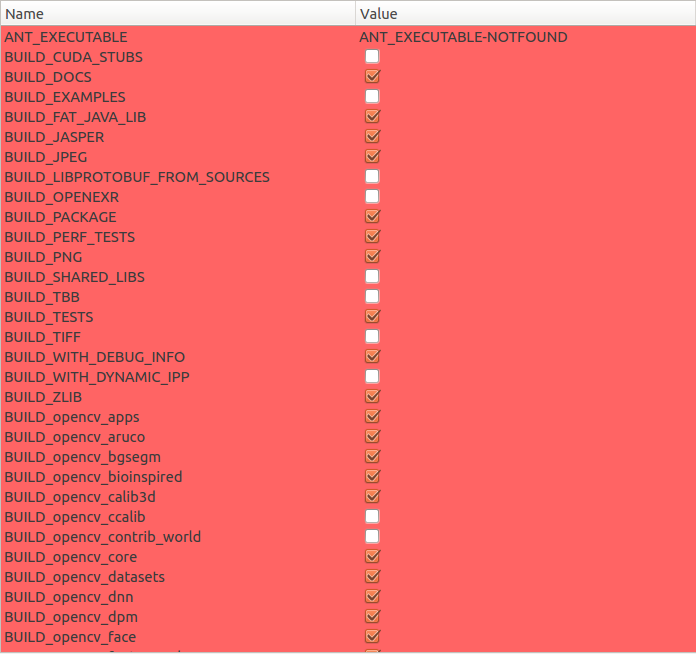
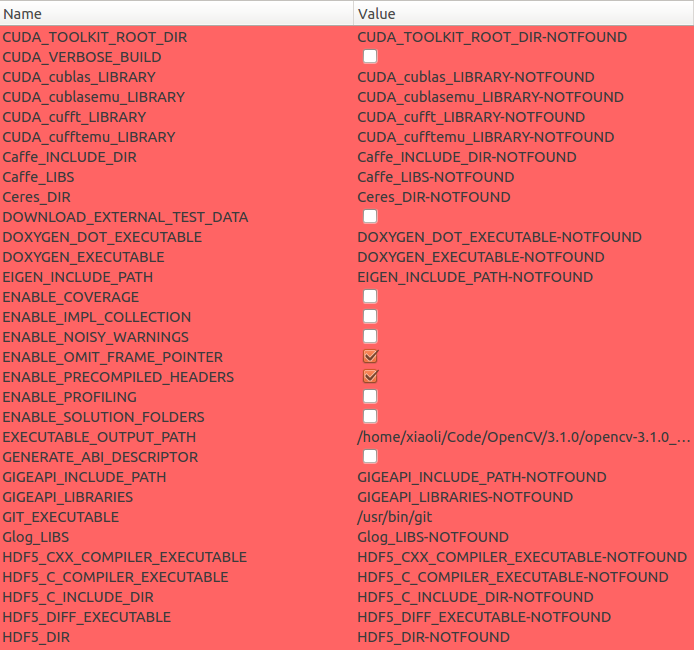
下面是关键的配置选择了
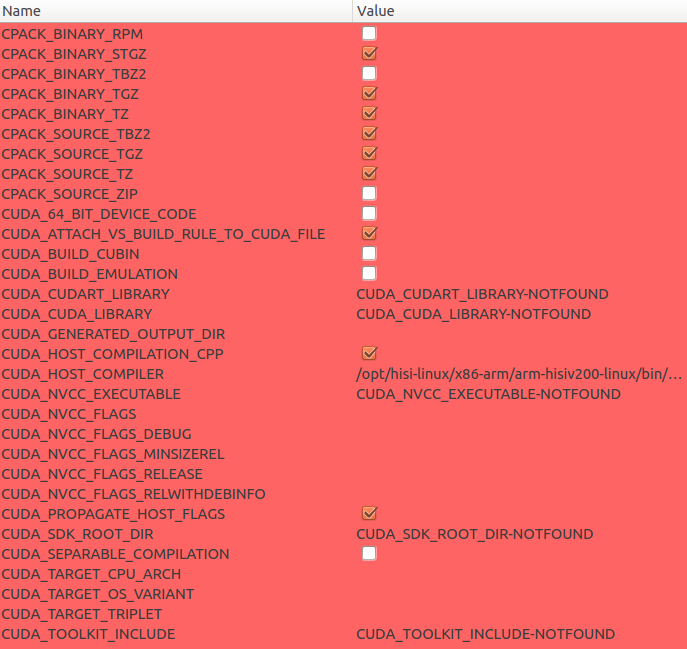
需要特别提出的几点是,WITH_CUDA WITH_TIFF 各种 TEST OPTION 需要取消。
编译工具选择 arm-hisiv200-gcc arm-hisiv200-g++, 路径要找到你安装的交叉编译工具的真正程序,注意不是link。默认的路径是/opt/hisi-linux/x86-arm/arm-hisiv200-linux/bin.
System选择Linux,Processor选择arm.
下面是详细的配置内容


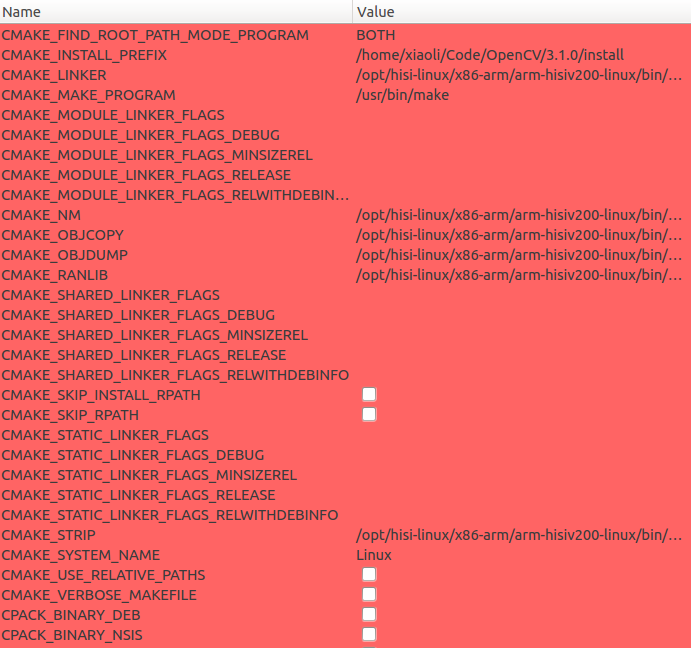


 细心的朋友应该可能看到,我编译的是静态库,嵌入式环境下,为了方便尽早验证功能,在存储空间允许的情况下我会先使用静态库,先实现好功能。
配置完成后,点击Configure后,点击Generate,这时候,在Where to build the binaries:选择的目录下就可以进行编译了,进入该目录。 执行make,然后静静的期待编译100%。 如果没有问题,执行make install,会在配置option CMAK_INSTALLPREFIX选择的目录下安装编译完成的库和头文件。
编写测试程序并编译验证
这里有个小技巧,opencv编译出来这么多库,编写makefile 或者 CMakeLists.txt的时候怎么知道链接顺序呢。 可以根据YOU/INSTALL/PATH/install/lib/pkgconfig/opencv.pc文件来作为参考,我的这个文件内容如下:
# Package Information for pkg-config

prefix=/home/xiaoli/Code/OpenCV/3.1.0/install
exec_prefix=${prefix}
libdir=${exec_prefix}/lib
includedir_old=${prefix}/include/opencv
includedir_new=${prefix}/include

Name: OpenCV
Description: Open Source Computer Vision Library
Version: 3.1.0
Libs: -L${exec_prefix}/lib -lopencv_stitching -lopencv_superres -lopencv_videostab -lopencv_photo -lopencv_aruco -lopencv_bgsegm -lopencv_bioinspired -lopencv_dnn -lopencv_dpm -lopencv_fuzzy -lopencv_line_descriptor -lopencv_optflow -lopencv_plot -lopencv_reg -lopencv_saliency -lopencv_stereo -lopencv_structured_light -lopencv_rgbd -lopencv_surface_matching -lopencv_tracking -lopencv_datasets -lopencv_text -lopencv_face -lopencv_xfeatures2d -lopencv_shape -lopencv_video -lopencv_ximgproc -lopencv_calib3d -lopencv_features2d -lopencv_flann -lopencv_xobjdetect -lopencv_objdetect -lopencv_highgui -lopencv_videoio -lopencv_imgcodecs -lopencv_ml -lopencv_imgproc -lopencv_core
Libs.private: -L${exec_prefix}/share/OpenCV/3rdparty/lib -lzlib -llibjpeg -llibwebp -llibpng -llibjasper -llibprotobuf -lstdc++ -ldl -lm -lpthread -lrt
Cflags: -I${includedir_old} -I${includedir_new}
熟悉makefile的朋友就看出来了,这就是动态库的链接顺序,静态库也是这个顺序,名字需要做修改,比如
-lopencv_stitching 修改为 libopencv_stitching.a
下面就是编写测试代码 代码根据opencv feature2D ,进行修改。
#if 0 //第一段程序是opencv最简单读取图片的一个操作,可以作为最初测试的验证
#include <iostream>
#include <opencv2/opencv.hpp>
#include <opencv2/core.hpp>
#include <opencv2/imgproc/imgproc.hpp>
//#include <opencv2/highgui/highgui.hpp>

using namespace std;
// 使用标准的cv库
using namespace cv;
int main( )
{
	Mat srcImage;
	srcImage = cv::imread("/tmp/box.png", IMREAD_GRAYSCALE);
	if( !srcImage.data )
	{
		cout << "Read a pic fail ." << endl;
		return 1;
	}
	else
	{
		cout << "Read a pic success ." << endl;
	}

  	//imshow("srcImage", srcImage);
  	//waitKey(0);
  	return 0;
}
#else
#if 0 //第二段代码才是识别代码,这里的头文件和官方例子略有不同第一种无法使用
#include <stdio.h>
#include <iostream>
#include "opencv2/core.hpp"
#include "opencv2/imgproc.hpp"
#include "opencv2/features2d.hpp"
//#include "opencv2/highgui.hpp"
#include "opencv2/calib3d.hpp"
#include "opencv2/xfeatures2d.hpp"
#else
#include <iostream>
#include <opencv2/opencv.hpp>
#include <opencv2/core.hpp>
#include <opencv2/imgproc/imgproc.hpp>
#include "opencv2/features2d.hpp"
#include "opencv2/calib3d.hpp"
#include "opencv2/xfeatures2d.hpp"
#endif
using namespace cv;
using namespace cv::xfeatures2d;
void readme();
/* @function main */
int main( int argc, char** argv )
{
  //为了便于测试,省略了输入参数选择文件得过程
  //if( argc != 3 )
  //{ readme(); return -1; }
  //Mat img_object = imread( argv[1], IMREAD_GRAYSCALE );
  //Mat img_scene = imread( argv[2], IMREAD_GRAYSCALE );

  //两张图片都是例子图片,参照我写"win10 opencv"那篇blog
  Mat img_object = imread( "/tmp/box.png", IMREAD_GRAYSCALE );
  Mat img_scene = imread( "/tmp/box_in_scene.png", IMREAD_GRAYSCALE );

  if( !img_object.data || !img_scene.data )
  { std::cout<< " --(!) Error reading images " << std::endl; return -1; }
  //-- Step 1: Detect the keypoints and extract descriptors using SURF
  int minHessian = 400;
  Ptr<SURF> detector = SURF::create( minHessian );
  std::vector<KeyPoint> keypoints_object, keypoints_scene;
  Mat descriptors_object, descriptors_scene;
  detector->detectAndCompute( img_object, Mat(), keypoints_object, descriptors_object );
  detector->detectAndCompute( img_scene, Mat(), keypoints_scene, descriptors_scene );
  //-- Step 2: Matching descriptor vectors using FLANN matcher
  FlannBasedMatcher matcher;
  std::vector< DMatch > matches;
  matcher.match( descriptors_object, descriptors_scene, matches );
  double max_dist = 0; double min_dist = 100;
  //-- Quick calculation of max and min distances between keypoints
  for( int i = 0; i < descriptors_object.rows; i++ )
  { double dist = matches[i].distance;
    if( dist < min_dist ) min_dist = dist;
    if( dist > max_dist ) max_dist = dist;
  }
  printf("-- Max dist : %f \n", max_dist );
  printf("-- Min dist : %f \n", min_dist );
  //-- Draw only "good" matches (i.e. whose distance is less than 3*min_dist )
  std::vector< DMatch > good_matches;
  for( int i = 0; i < descriptors_object.rows; i++ )
  { if( matches[i].distance < 3*min_dist )
     { good_matches.push_back( matches[i]); }
  }
  Mat img_matches;
  drawMatches( img_object, keypoints_object, img_scene, keypoints_scene,
               good_matches, img_matches, Scalar::all(-1), Scalar::all(-1),
               std::vector<char>(), DrawMatchesFlags::NOT_DRAW_SINGLE_POINTS );
  //-- Localize the object
  std::vector<Point2f> obj;
  std::vector<Point2f> scene;
  for( size_t i = 0; i < good_matches.size(); i++ )
  {
    //-- Get the keypoints from the good matches
    obj.push_back( keypoints_object[ good_matches[i].queryIdx ].pt );
    scene.push_back( keypoints_scene[ good_matches[i].trainIdx ].pt );
  }
  Mat H = findHomography( obj, scene, RANSAC );
  //-- Get the corners from the image_1 ( the object to be "detected" )
  std::vector<Point2f> obj_corners(4);
  obj_corners[0] = cvPoint(0,0); obj_corners[1] = cvPoint( img_object.cols, 0 );
  obj_corners[2] = cvPoint( img_object.cols, img_object.rows ); obj_corners[3] = cvPoint( 0, img_object.rows );
  std::vector<Point2f> scene_corners(4);
  perspectiveTransform( obj_corners, scene_corners, H);
  //-- Draw lines between the corners (the mapped object in the scene - image_2 )
  line( img_matches, scene_corners[0] + Point2f( img_object.cols, 0), scene_corners[1] + Point2f( img_object.cols, 0), Scalar(0, 255, 0), 4 );
  line( img_matches, scene_corners[1] + Point2f( img_object.cols, 0), scene_corners[2] + Point2f( img_object.cols, 0), Scalar( 0, 255, 0), 4 );
  line( img_matches, scene_corners[2] + Point2f( img_object.cols, 0), scene_corners[3] + Point2f( img_object.cols, 0), Scalar( 0, 255, 0), 4 );
  line( img_matches, scene_corners[3] + Point2f( img_object.cols, 0), scene_corners[0] + Point2f( img_object.cols, 0), Scalar( 0, 255, 0), 4 );
  //因为我的嵌入式环境没有UI所以这句需要屏蔽
  //-- Show detected matches
  //imshow( "Good Matches & Object detection", img_matches );

  //讲识别结果另存为一张图片
  //-- Save result img
  imwrite("Result.png", img_matches);

  //无需等待按键,直接返回
  //waitKey(0);
  return 0;
  }
  /* @function readme */
  void readme()
  { std::cout << " Usage: ./SURF_descriptor <img1> <img2>" << std::endl; }
#endif
如果程序都没有问题,执行完之后,会在对应位置生成一张新的图片,复制到宿主机,直接查看即可。