怎么在win10上搭建opencv开发环境
准备工作
首先需要安装好vs2019,具体版本可以根据opencv的版本进行更换,本文选择2019。具体安装方式和细节,可以参考我另一篇blog。 因为opencv官方流程推荐使用cmake进性编译,需要提前下载cmake. 准备好编译工具之后,就是需要准备opencv源代码了。 opencv源代码分为两个部分,第一部分opencv 作为稳定的核心功能;第二部分opencv_contrib 作为较不稳定的扩展功能包。本文选择的两部分源码均为编写blog时最新的稳定版本4.2.0.
IDE 和 编译工具安装好, 源码包也下载好后,就可以开始我们的搭建流程了。Let’s go.
创建开发环境文件结构
首先解压下载好的压缩包 opencv-4.2.0.zip 建议在与之平行的目录下新建文件夹 opencv-4.2.0_build ,作为编译结果的存放位置。
配置cmake和生成
打开cmke,选择好source code的位置,和build the binaries的位置。
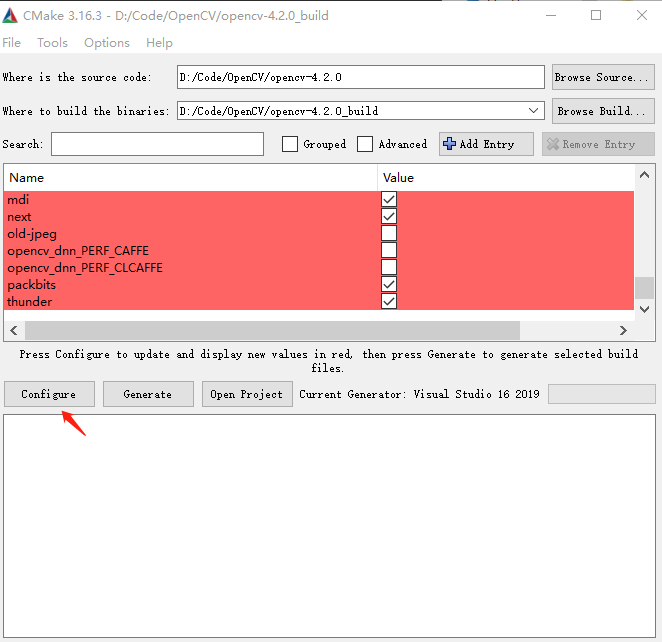 点击Configure,等待进度条完成, 第一次配置完成之后,在Search栏中输入 OPENCV_EXTRA_MODULES_PATH 选择opencv_contrib解压后的文件夹位置。
在Search栏中输入 BUILD_opencv_xfeatures2d 并勾选该选项。
再次点击Configure,完成后 点击Generate.耐心等待。
 如果在生成过程中报错出现红色文件,可以根据 ../opencv-4.2.0_build/CMakeDownloadLog.txt 的日志进行排查,在整个过程中,需要联网下载一些文件库,建议开启全局科学上网,如果还是无法下载,可以通过手工下载的方式,如果需要下载的文件较小,可以通过网页直接访问日志中的网址,复制到指定的文件名,放在指定的位置即可,推荐的方式是 在window10下安装cmder这个命令行工具,使用 curl link_address > file_name 这种方式进性下载,能够看到下载过程,也不会出现校验文件报错。建议一定要到没有报错之后再进行后面的步骤。
这里举一个我在配置编译的过程中遇到的一个下载错误:
如果在生成过程中报错出现红色文件,可以根据 ../opencv-4.2.0_build/CMakeDownloadLog.txt 的日志进行排查,在整个过程中,需要联网下载一些文件库,建议开启全局科学上网,如果还是无法下载,可以通过手工下载的方式,如果需要下载的文件较小,可以通过网页直接访问日志中的网址,复制到指定的文件名,放在指定的位置即可,推荐的方式是 在window10下安装cmder这个命令行工具,使用 curl link_address > file_name 这种方式进性下载,能够看到下载过程,也不会出现校验文件报错。建议一定要到没有报错之后再进行后面的步骤。
这里举一个我在配置编译的过程中遇到的一个下载错误:
#cmake_download "D:/Code/OpenCV/opencv-4.2.0/.cache/xfeatures2d/ \
vgg/151805e03568c9f490a5e3a872777b75-vgg_generated_120.i" \
"https://raw.githubusercontent.com/opencv/ \
opencv_3rdparty/fccf7cd6a4b12079f73bbfb21745f9bab \
cd4eb1d/vgg_generated_120.i"
#try 1
# Uses proxy env variable no_proxy == '192.168.99.100'
# timeout on name lookup is not supported
#   Trying 151.101.108.133:443...
# TCP_NODELAY set
# Connected to raw.githubusercontent.com (151.101.108.133) port 443 (#0)
# schannel: ALPN, offering http/1.1
# schannel: ALPN, server accepted to use http/1.1
# GET
/opencv/opencv_3rdparty \
/fccf7cd6a4b12079f73bbfb21745f9babcd4eb1d/vgg_generated_120.i HTTP/1.1
这个时候使用推荐的方法,首先在 ../opencv-4.2.0_build/CMakeDownloadLog.txt查找日志,搜索文件的下载链接link,然后找到需要下载后copy到的目的位置。 就可以在cmder 的bash模式下 使用命令curl link_address > file_name 注意文件名必须和日志中一致。然后再次进性configure和generate,两个步骤。
编译生成目标库
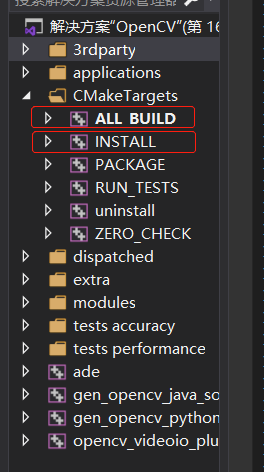
打开opencv-4.2.0_build文件夹,找到OpenCV.sln双击打开项目。
 方法一:点击项目结构中的批量生成,选择你的系统平台的的debug和release,还有install.
生成时间有点长,这会可以干点别的休息下。
方法二:右键点击ALL_BUILD,然后点击生成,完成后右键点击INTALL,再点击生成。
方法一:点击项目结构中的批量生成,选择你的系统平台的的debug和release,还有install.
生成时间有点长,这会可以干点别的休息下。
方法二:右键点击ALL_BUILD,然后点击生成,完成后右键点击INTALL,再点击生成。
 好啦,无报错编译生成后,将opencv_build文件夹下install文件夹,单独复制出来。
我是复制到了opencv_build平行路径下,并且重命名为vc16x64,可以根据自己平台和软件版本进行重命名。
好啦,无报错编译生成后,将opencv_build文件夹下install文件夹,单独复制出来。
我是复制到了opencv_build平行路径下,并且重命名为vc16x64,可以根据自己平台和软件版本进行重命名。
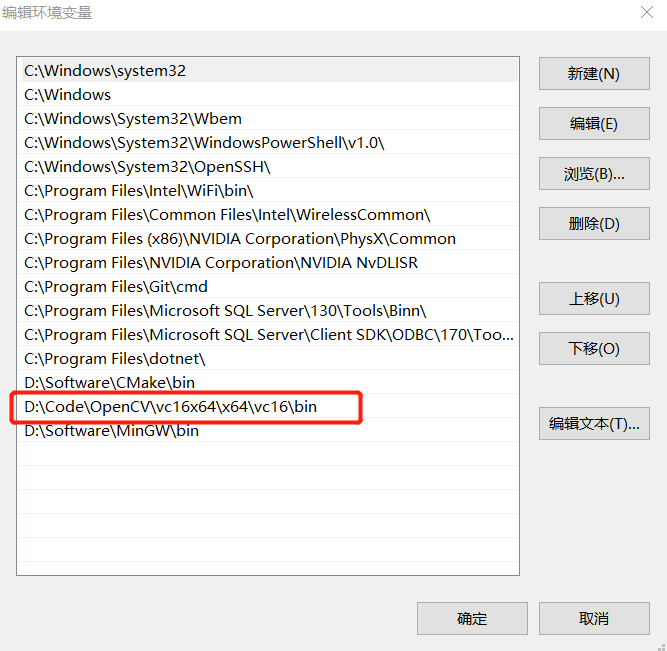
添加环境变量
创建自己的opencv 测试项目
接下来就是使用编译生成好的opencv相关的一系列库来实现我们需要的功能了。
建议再opencv_build平行目录下,创建一个新的文件夹MyOpenCV并创建一个新的vs2019项目。
新建一个控制台项目并选择好系统平台(x86 or x64),然后配置项目属性。
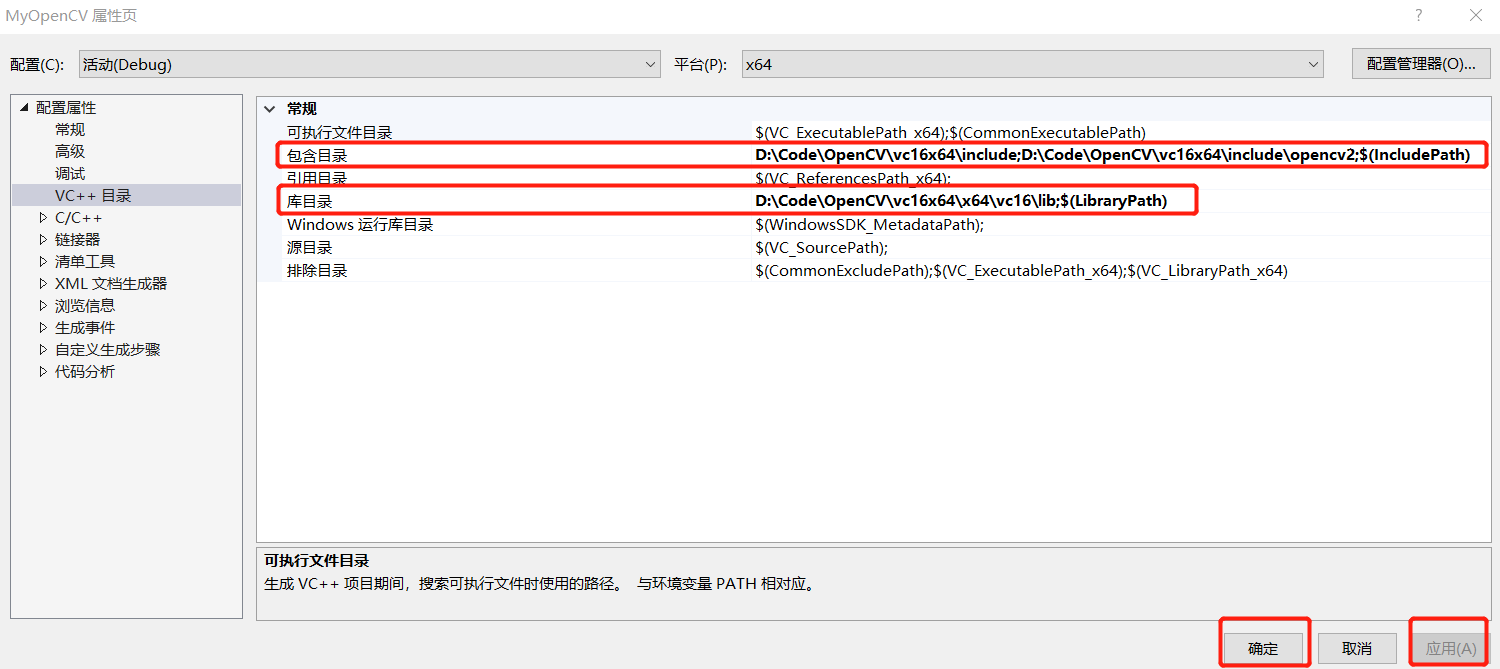
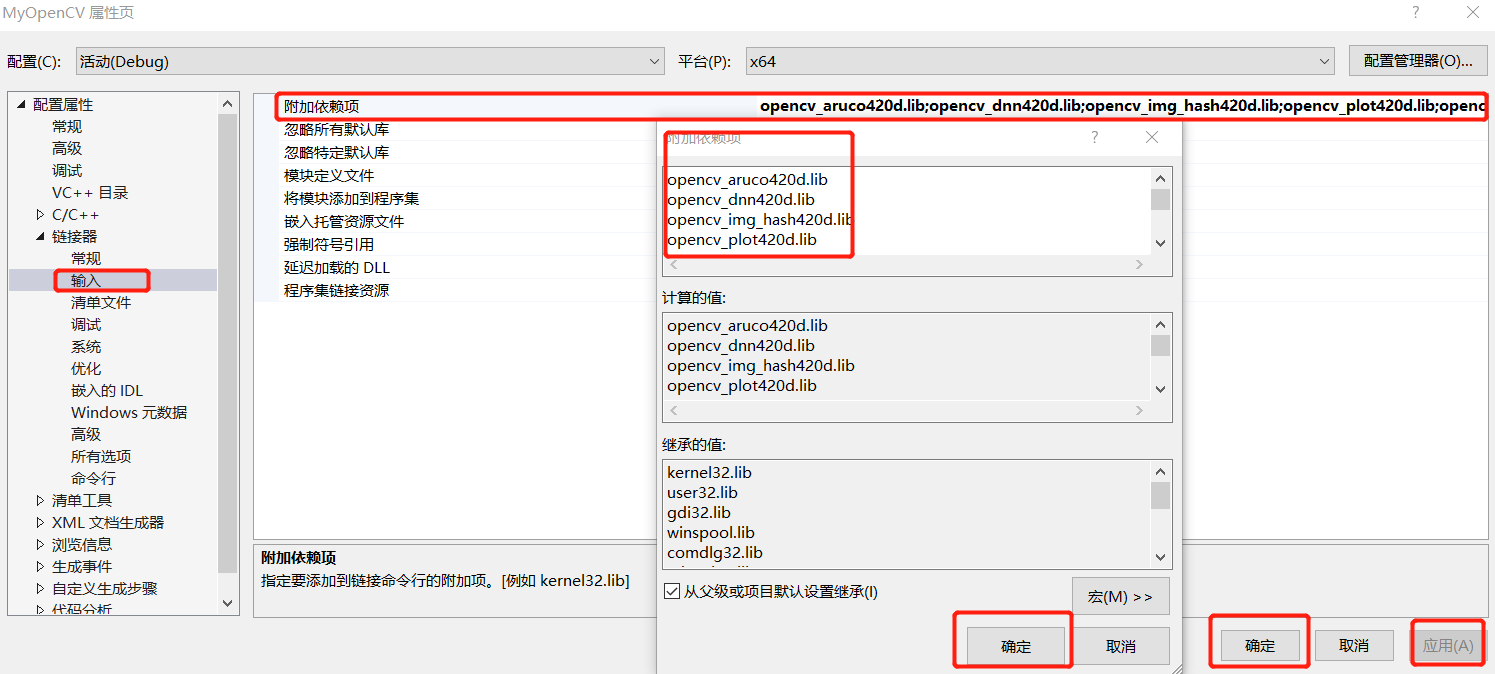
附加依赖项:
opencv_aruco420d.lib
opencv_dnn420d.lib
opencv_img_hash420d.lib
opencv_plot420d.lib
opencv_superres420d.lib
opencv_xobjdetect420d.lib
opencv_bgsegm420d.lib
opencv_dpm420d.lib
opencv_imgcodecs420d.lib
opencv_quality420d.lib
opencv_surface_matching420d.lib
opencv_xphoto420d.lib
opencv_bioinspired420d.lib
opencv_face420d.lib
opencv_imgproc420d.lib
opencv_reg420d.lib
opencv_text420d.lib
opencv_calib3d420d.lib
opencv_features2d420d.lib
opencv_line_descriptor420d.lib
opencv_rgbd420d.lib
opencv_tracking420d.lib
opencv_ccalib420d.lib
opencv_flann420d.lib
opencv_ml420d.lib
opencv_saliency420d.lib
opencv_video420d.lib
opencv_core420d.lib
opencv_fuzzy420d.lib
opencv_objdetect420d.lib
opencv_shape420d.lib
opencv_videoio420d.lib
opencv_datasets420d.lib
opencv_gapi420d.lib
opencv_optflow420d.lib
opencv_stereo420d.lib
opencv_videostab420d.lib
opencv_dnn_objdetect420d.lib
opencv_hfs420d.lib
opencv_phase_unwrapping420d.lib
opencv_stitching420d.lib
opencv_xfeatures2d420d.lib
opencv_dnn_superres420d.lib
opencv_highgui420d.lib
opencv_photo420d.lib
opencv_structured_light420d.lib
opencv_ximgproc420d.lib
从opencv源代码中copy测试图片,到你自己指定的目录下。
opencv-4.2.0\samples\data\box_in_scene.png
opencv-4.2.0\samples\data\box.png
编写项目代码
#include <iostream>
#include "opencv2/core.hpp"
#define HAVE_OPENCV_XFEATURES2D
#ifdef HAVE_OPENCV_XFEATURES2D
#include "opencv2/calib3d.hpp"
#include "opencv2/highgui.hpp"
#include "opencv2/imgproc.hpp"
#include "opencv2/features2d.hpp"
#include "opencv2/xfeatures2d.hpp"
using namespace cv;
using namespace cv::xfeatures2d;
using std::cout;
using std::endl;
const char* keys =
"{ help h |                  | Print help message. }"
"{ input1 | box.png          | Path to input image 1. }"
"{ input2 | box_in_scene.png | Path to input image 2. }";
int main(int argc, char* argv[])
{
    CommandLineParser parser(argc, argv, keys);
    //Mat img_object = imread(samples::findFile(parser.get<String>("input1")), IMREAD_GRAYSCALE);
    //Mat img_scene = imread(samples::findFile(parser.get<String>("input2")), IMREAD_GRAYSCALE);
    Mat img_object = imread("D:/Code/OpenCV/TestPictureDir/box.png", IMREAD_GRAYSCALE);
    Mat img_scene = imread("D:/Code/OpenCV/TestPictureDir/box_in_scene.png", IMREAD_GRAYSCALE);
    if (img_object.empty() || img_scene.empty())
    {
        cout << "Could not open or find the image!\n" << endl;
        parser.printMessage();
        return -1;
    }
    //-- Step 1: Detect the keypoints using SURF Detector, compute the descriptors
    int minHessian = 400;
    Ptr<SURF> detector = SURF::create(minHessian);
    std::vector<KeyPoint> keypoints_object, keypoints_scene;
    Mat descriptors_object, descriptors_scene;
    detector->detectAndCompute(img_object, noArray(), keypoints_object, descriptors_object);
    detector->detectAndCompute(img_scene, noArray(), keypoints_scene, descriptors_scene);
    //-- Step 2: Matching descriptor vectors with a FLANN based matcher
    // Since SURF is a floating-point descriptor NORM_L2 is used
    Ptr<DescriptorMatcher> matcher = DescriptorMatcher::create(DescriptorMatcher::FLANNBASED);
    std::vector< std::vector<DMatch> > knn_matches;
    matcher->knnMatch(descriptors_object, descriptors_scene, knn_matches, 2);
    //-- Filter matches using the Lowe's ratio test
    const float ratio_thresh = 0.75f;
    std::vector<DMatch> good_matches;
    for (size_t i = 0; i < knn_matches.size(); i++)
    {
        if (knn_matches[i][0].distance < ratio_thresh * knn_matches[i][1].distance)
        {
            good_matches.push_back(knn_matches[i][0]);
        }
    }
    //-- Draw matches
    Mat img_matches;
    drawMatches(img_object, keypoints_object, img_scene, keypoints_scene, good_matches, img_matches, Scalar::all(-1),
        Scalar::all(-1), std::vector<char>(), DrawMatchesFlags::NOT_DRAW_SINGLE_POINTS);
    //-- Localize the object
    std::vector<Point2f> obj;
    std::vector<Point2f> scene;
    for (size_t i = 0; i < good_matches.size(); i++)
    {
        //-- Get the keypoints from the good matches
        obj.push_back(keypoints_object[good_matches[i].queryIdx].pt);
        scene.push_back(keypoints_scene[good_matches[i].trainIdx].pt);
    }
    Mat H = findHomography(obj, scene, RANSAC);
    //-- Get the corners from the image_1 ( the object to be "detected" )
    std::vector<Point2f> obj_corners(4);
    obj_corners[0] = Point2f(0, 0);
    obj_corners[1] = Point2f((float)img_object.cols, 0);
    obj_corners[2] = Point2f((float)img_object.cols, (float)img_object.rows);
    obj_corners[3] = Point2f(0, (float)img_object.rows);
    std::vector<Point2f> scene_corners(4);
    perspectiveTransform(obj_corners, scene_corners, H);
    //-- Draw lines between the corners (the mapped object in the scene - image_2 )
    line(img_matches, scene_corners[0] + Point2f((float)img_object.cols, 0),
        scene_corners[1] + Point2f((float)img_object.cols, 0), Scalar(0, 255, 0), 4);
    line(img_matches, scene_corners[1] + Point2f((float)img_object.cols, 0),
        scene_corners[2] + Point2f((float)img_object.cols, 0), Scalar(0, 255, 0), 4);
    line(img_matches, scene_corners[2] + Point2f((float)img_object.cols, 0),
        scene_corners[3] + Point2f((float)img_object.cols, 0), Scalar(0, 255, 0), 4);
    line(img_matches, scene_corners[3] + Point2f((float)img_object.cols, 0),
        scene_corners[0] + Point2f((float)img_object.cols, 0), Scalar(0, 255, 0), 4);
    //-- Show detected matches
    imshow("Good Matches & Object detection", img_matches);
    waitKey();
    return 0;
}
#else
int main()
{
    std::cout << "This tutorial code needs the xfeatures2d contrib module to be run." << std::endl;
    return 0;
}
#endif
编译运行结果如下:
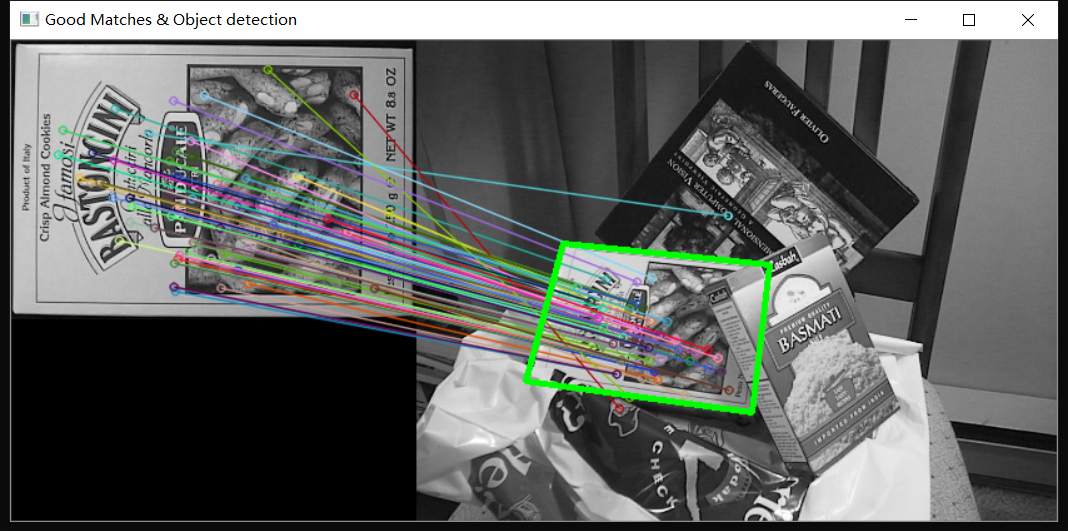
图片完美匹配,本blog格式上还会有所调整,会更易阅读,后续会针对测试代码进行专门的讲解。